The photo tool allows you to add photos to your floor plans. From photos of furniture and flooring to interior details and photos of your existing space, the photo tool is a great way to bring your floor plans to life.
The photo tool is located in the tools palette at the top of the screen and is represented as an icon of a camera. The cursor shows the camera icon to indicate that the photo tool is active.
Note: The photo tool is an advanced design feature and is revealed by clicking the Show All Tools link in the top right corner of the screen.
To Add Photos:
| 1. | Select the photo tool from the tools palette by clicking on the camera icon. |

| 2. | Click on the area of the floor plan where you want to add a photo. This inserts a picture icon in that location of the floor plan. |
| 3. | The photo info panel appears to allow you to enter the details of the photo you want to add to your floor plan. |
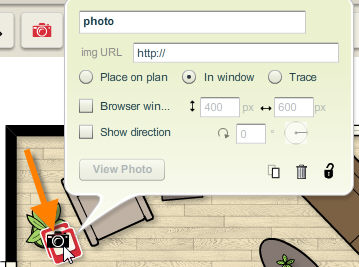
| • | Photo name: the topmost field allows you to enter your own name for the photo. The name “photo” appears by default. To add your own name, simply click on the field and enter the text for the name of your photo. |
| • | Image URL: the "img URL" field contains the web address of the photo you want to appear on your floor plan. Type in the web address at which the photo is located. |
NOTE: Only images that exist on a web site that is not secure can be added to your floor plans. Web sites beginning with HTTPS are not supported. An image saved on your computer cannot be used unless you first upload it to a Photo Sharing web site.
| a. | To include a photo that appears on an existing web site like a product image or a photo of a room design you like: |
| i. | Open the web page in a separate browser window. Next, choose the following option depending on the web browser you’re using: |
| • | For Internet Explorer in Windows, right-click on the image you want to use. Choose the “Properties” option from the pop up list. From the properties panel, select the text next to “Address (URL)” and chose Copy from the Edit menu. |
| • | For Firefox in Windows, right-click on the image you want to use. Choose the “Copy Image Location” option from the pop up list. |
| • | For Safari on the Mac, CTRL-click on the image you want to use. Choose the “Copy Image Address” option from the pop up list. |
| • | For Firefox on the Mac, CTRL-click on the image you want to use. Choose the “Copy Image Location” option from the pop up list. |
| ii. | Return to Icovia and paste the URL into the “img URL” field. |
| b. | To add a photo saved on your computer: |
| i. | Visit a free image sharing web site like Photobucket.com, create an account and follow the instructions to upload your images. Next, choose the following option depending on the web browser you’re using: |
| • | For Internet Explorer in Windows, right-click on the large version of your image. Choose the “Properties” option from the pop up list. From the properties panel, select the text next to “Address (URL)” and chose Copy from the Edit menu. |
| • | For Firefox in Windows, right-click on the large version of your image. Choose the “Copy Image Location” option from the pop up list. |
| • | For Safari on the Mac, CTRL-click on the large version of your image. Choose the “Copy Image Address” option from the pop up list. |
| • | For Firefox on the Mac, CTRL-click on the large version of your image. Choose the “Copy Image Location” option from the pop up list. |
| ii. | Return to Icovia and paste the URL into the “img URL” field. |
| • | You can also select how you want the photo to appear on your floor plan. You can choose whether to include a photo icon that opens the photo in a window, display the picture directly on the plan, or use the photo to trace your floor plan. |
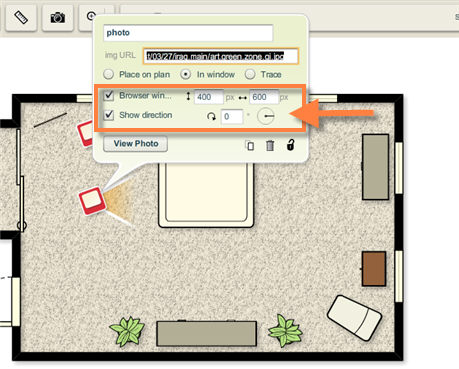
| a. | “In window” option – select the “in window” option to display the image in a new window when the “view photo” button in the photo info panel is clicked. This option is the default setting for new photos. |
| i. | When this option is selected, you can also check the “browser window” option. This allows the photo to appear in a separate browser window rather than appearing in a floating window within Icovia. When this option is selected, you can enter the dimensions you want the browser window to display the image in. These fields appear automatically when the “in window” option is selected. |
| ii. | You can also set the pointer on the photo icon to appear and control the direction it’s facing by checking the “show direction” box and manipulating the rotation controls. These fields appear automatically when the “in window” option is selected. |
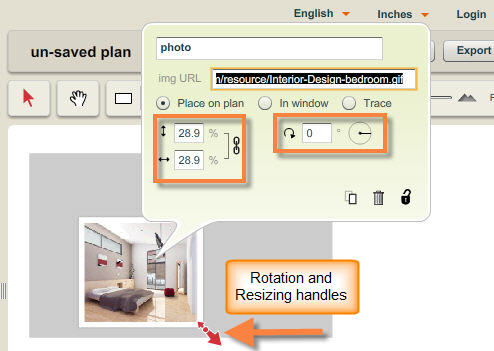
| b. | "Place on Plan"option: Select Place on Plan if you want the photo to appear directly on the floor plan. |
| i. | You can also set the scale of the placed photo by clicking and dragging the scale handle x that appears in the lower right corner of the photo or by changing the percentage values for height and width in the photo info panel. These fields for entering the percentage appear automatically when you select this option and the values represent the percentage of the original image scale, which is set to 100% by default. |
| ii. | The  symbol to the right of the percentage fields indicates that the aspect ratio will be maintained and will not stretch or distort while resizing the image. To unlock this, click on the symbol and it will change to symbol to the right of the percentage fields indicates that the aspect ratio will be maintained and will not stretch or distort while resizing the image. To unlock this, click on the symbol and it will change to  indicating that the aspect ratio is no longer locked. You will now be able to enter independent values for the height and width. indicating that the aspect ratio is no longer locked. You will now be able to enter independent values for the height and width. |
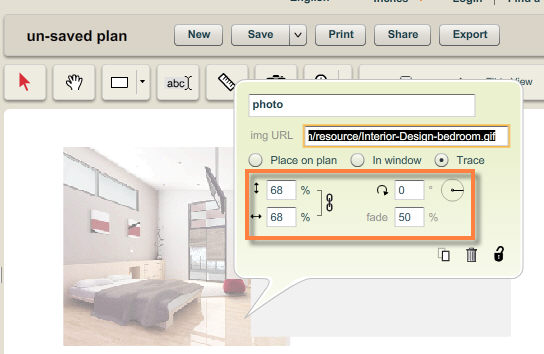
| “Trace” option – Select Trace option to display a transparent version of the image that you can use to trace over. Choosing this option fades the image and sends the image to the back so plan elements like walls and symbols are visible. |
| ii. | You can also set the scale of the placed photo by changing the percentage values for height and width in the photo info panel. These fields for entering the percentage appear automatically when you select this option and the values represent the percentage of the original image scale, which is set to 100% by default. |
| iii. | The symbol to the right of the percentage fields indicates that the aspect ratio will be maintained and will not stretch or distort while resizing the image. To unlock this, click on the symbol and it will change to indicating that the aspect ratio is no longer locked. You will now be able to enter independent values for the height and width. |
| iv. | To rotate the photo on your floor plan, use the rotation controls that appear when the “trace” option is selected. |
| v. | To change the fade value of the trace image, enter a new value in the fade field, which appears when the “trace” option is selected. The fade value is set to 50% opacity by default. A value of 100% is completely opaque (no fade) and 0% is completely transparent. |
| 4. | Click on the photo icon and click on the  icon in the photo information panel to delete the image. icon in the photo information panel to delete the image. |
| 5. | Click on the  to clone the photo. to clone the photo. |
| 6. | Click on the  icon to photo to prevent changes from being made. The icon changes to icon to photo to prevent changes from being made. The icon changes to  indicating that the photo is locked for editing. Click on it to unlock the photo. indicating that the photo is locked for editing. Click on it to unlock the photo. |


