The line tool allows you to add a wide variety of styled line to your floor plans. Lines can be solid or dotted, straight or curved, colored, and include a variety of thicknesses and end cap styles. Measurement values can also be displayed. Line properties can be customized using the options provided in the line info panel that appears when you select a line shape on your plan or through the line tool settings.
The line tool is available in the tools palette at the top of the screen and can be selected by clicking the small arrow to the right of the wall tool. An icon of an arrow represents the line tool.
Note: The line tool is an advanced design feature and is revealed by clicking the Show All Tools link in the top right corner of the screen.
Creating a New Line
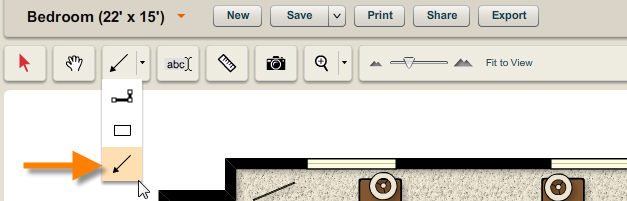
| 1. | Click the  on the right side of the wall tool icon in the tools palette. on the right side of the wall tool icon in the tools palette. |
| 2. | A pull down list of the options appears to reveal the wall, surface and line tools. |
| 3. | Select the line tool by clicking on the icon of an arrow. |
| 4. | Your cursor is displayed as a + sign when the line tool is selected. |
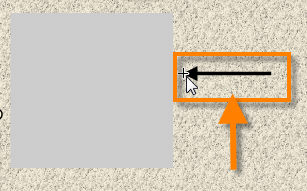
| 5. | Click on the workspace at the point at which you would like to start the line and drag it to the point you want. Release the cursor when you have reached the desired length. Alternatively, you can click once to indicate the first point, move your cursor and then click a second time to indicate the second point. |
| 6. | An arrow is set as the default style for new lines. You can select a style of your choice using the line info panel or modify the line tool settings to affect the style of all new lines you create. |
Modifying a Line
Once you create a line, it can be edited at any time using the line info panel.
To change the appearance of an existing line:
| 1. | Select a line in your plan using the selection tool. |
| 2. | The selected line will appear highlighted and the line info panel will appear. |
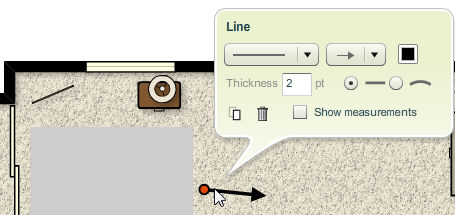
| 3. | You can modify the following line properties using the line info panel: |
| • | Line style drop-down menu – The drop-down button to the right of the line style field displays the current line style. Click on the  sign to view a drop-down list of available line styles. Select a line style by clicking on it. The selected line will reflect the new line style. sign to view a drop-down list of available line styles. Select a line style by clicking on it. The selected line will reflect the new line style. |
| • | Line end cap drop-down menu – The drop-down button to the right of the line end cap field displays the current line end cap style. Click on the sign to view a drop-down list of available line end cap styles. Select a line end cap style by clicking on it. The selected line will reflect the new end cap style. |
| • | Line color – Click on the square to the right of the line end cap drop-down menu to pick a new color for the line. A color palette will be displayed. Select the new line color from the color palette. The line will reflect the new color. |
| • | Line thickness field – The Thickness field will display the line's current thickness. Enter the new thickness in the thickness field. The line will reflect the new thickness. |
| • | Curved line option – Select the round button for the curved line symbol ( ) to make the line a curved line. ) to make the line a curved line. |
| • | Show measurements box – Select the Show Measurements checkbox to display the line's measurements. |
| 4. | You can also clone and delete the line using the clone ( ) button and delete ( ) button and delete ( ) button. ) button. |
| 5. | Move your cursor away from the line info panel to close it. |


