|
<< Click to Display Table of Contents >> Export |
  
|
|
<< Click to Display Table of Contents >> Export |
|
Icovia allows you to export a plan as a JPEG file that you can save to your computer, retouch using your own image editing software and share with others. This feature is accessed through the Save button pull-down in the Plan Control bar or the File Menu. Click on the ![]() sign to view the list of available options and select Export by clicking on it.
sign to view the list of available options and select Export by clicking on it.
Note: The File Menu is only displayed when the Show All Tools option is turned on.

| 1. | Click on Export under the Save drop down menu. |
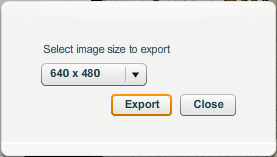
| 2. | A window appears prompting you to select the size of the image you want to export. Click on the |
| 3. | The next step is to select the location on your computer where you want to save the exported image. The Save As dialog is displayed. Type in a name for the image file in the File name field and browse to the folder on your computer where you would like to save the file. |
| 4. | Click on the Save button when you find the desired location. The exported plan will be saved at the selected location with the specified file name. |