You may have an existing floor plan that you want to trace over in Icovia. For example, you may have a scanned image of the floor plan of your home or office. To trace over the image instead of using measurements to create the plan from scratch, follow the directions below.
To Trace Over an Existing Floor Plan
Only images that exist on a web server or appear on an existing web site can be added to your floor plans. An images saved on your computer cannot be used unless you first upload it to an image-sharing web site like Photobucket.com.
1. Upload a photo saved on your computer to an image sharing service
| • | Visit a free image-sharing web site like Photobucket.com. |
| • | Create an account so you can use their image upload service.• Follow the instructions to upload your image(s). |
| • | The next step is to view the largest version of your image at the image-sharing web site. |
| • | Next, copy the web address (URL) of the image. Note: the image URL is different from the URL of the web page. To do this, choose the following option depending on the web browser you’re using: |
| ▪ | For Internet Explorer in Windows, right-click on the large version of your image. Choose the “Properties” option from the pop up list. From the properties panel, select the text next to “Address (URL)” and chose Copy from the Edit menu. |
| ▪ | For Firefox in Windows, right-click on the large version of your image. Choose the “Copy Image Location” option from the pop up list. |
| ▪ | For Safari on the Mac, CTRL-click on the large version of your image. Choose the “Copy Image Address” option from the pop up list. |
| ▪ | For Firefox on the Mac, CTRL-click on the large version of your image. Choose the “Copy Image Location” option from the pop up list. |
| 2. | Next, select the photo tool from the tools palette by clicking on the camera icon. |

| 3. | Click on the center of the workspace. This inserts a photo icon in that location of the floor plan. |
| 4. | The photo info panel will appear. |
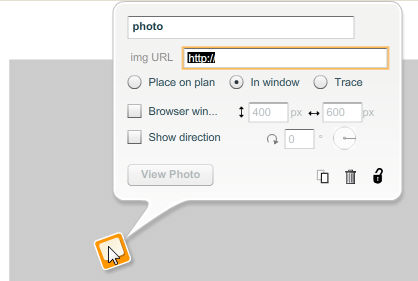
| 5. | Click on the “Image URL” field in the photo info panel. |
| 6. | Paste the image URL you copied into the "img URL" field using the Paste command in the Edit menu at the top of your screen. |
| • | Note: the Paste command is not found in Icovia’s Edit menu, but rather the Edit menu at the very top of your screen. |
| 7. | Next, click on the Trace option in the photo info panel. |
| 8. | A transparent version of the image will appear in your plan that you can use to trace over. |
| • | Choosing this option fades the image and sends the image to the back so plan elements like walls and symbols are visible. |
| 9. | The next step is to set the scale of your image to match the “real world” scale of the Icovia workspace. To do this, find the longest known wall dimension in the floor plan. |
| 10. | Using the dimension tool, draw a measurement in the workspace that matches the known dimension you found. |
| 11. | Next, adjust the scale of the trace image you added. To do this: |
| • | Click on the image of your floor plan. |
| • | The photo info panel will appear. |
| • | Click into the height or width field in the lower left corner of the photo info panel and change the default value from 100% to a new value. Your trace image will resize based on the new scale value you entered. |
| • | Experiment with this value until the known dimension in your trace image matches the length of the measurement you created with the dimension tool. |
| 12. | Once you have your trace image set to the proper scale, lock it in place using the  icon in the photo info panel. icon in the photo info panel. |
| 13. | Now, trace over the image using the wall tool, structural symbols and other items. |


